What Is Cilium? A Beginner's Guide to Kubernetes Networking with eBPF
If you work with Kubernetes you have probably seen the name “Cilium” come up in conversations. It is now the default networking plugin on GKE, EKS, and AKS. Maybe someone at a meetup told you to switch to it, but you were not sure what it actually does.
This post is for that situation. I will explain what Cilium is, what problem it solves, and how eBPF (the technology underneath) fits in. You do not need kernel expertise to follow along.
Kubernetes Networking Basics
Before we talk about Cilium, we need to cover how Kubernetes handles networking by default.
Each pod in Kubernetes gets its own IP address. Pods can talk to each other directly using those IPs, but there is a catch: pod IPs change whenever a pod restarts, scales, or moves to a different node. You cannot hardcode them.
Kubernetes solves this with a Service, which provides a stable IP and DNS name that points to a set of pods. When traffic reaches the Service IP, it gets forwarded to one of the backend pods. The component that does this forwarding is called kube-proxy.
# Every node runs kube-proxy
kubectl get daemonset -n kube-system kube-proxy
Kube-proxy traditionally uses iptables, a Linux tool for filtering and routing network packets, to rewrite packet destinations. This works fine at small scale, but it has problems when your cluster grows beyond a few dozen services.
The other piece of the puzzle is the CNI plugin. CNI (Container Network Interface) is a standard for configuring network interfaces in containers. The CNI plugin assigns IPs to pods and makes sure traffic can flow between them. Popular CNI plugins include Flannel, Calico, Weave, and Cilium.
To summarize: kube-proxy handles Service IP forwarding, and the CNI plugin handles pod networking. Cilium replaces both.
Why the Default Approach Falls Apart at Scale
Kube-proxy with iptables works well for small clusters. As your cluster grows, performance degrades.
Every time a Service is added or removed, kube-proxy rewrites the entire iptables ruleset. With a handful of services the ruleset is small. With hundreds of services it becomes thousands of rules. With thousands of services, tens of thousands.
Three things break at this point:
- Latency grows with the rule count. Each packet is checked against every rule until it finds a match. More services means slower packet processing.
- CPU spikes on every ruleset change. Every update consumes noticeable CPU across all nodes. In busy clusters these spikes compound.
- No application-level visibility. Iptables operates at the network layer. It sees IP addresses and ports but cannot understand HTTP paths, gRPC methods, or database query types.
If you have noticed your cluster’s network latency increasing as you add services, or seen CPU spikes during deployments, this is likely why.
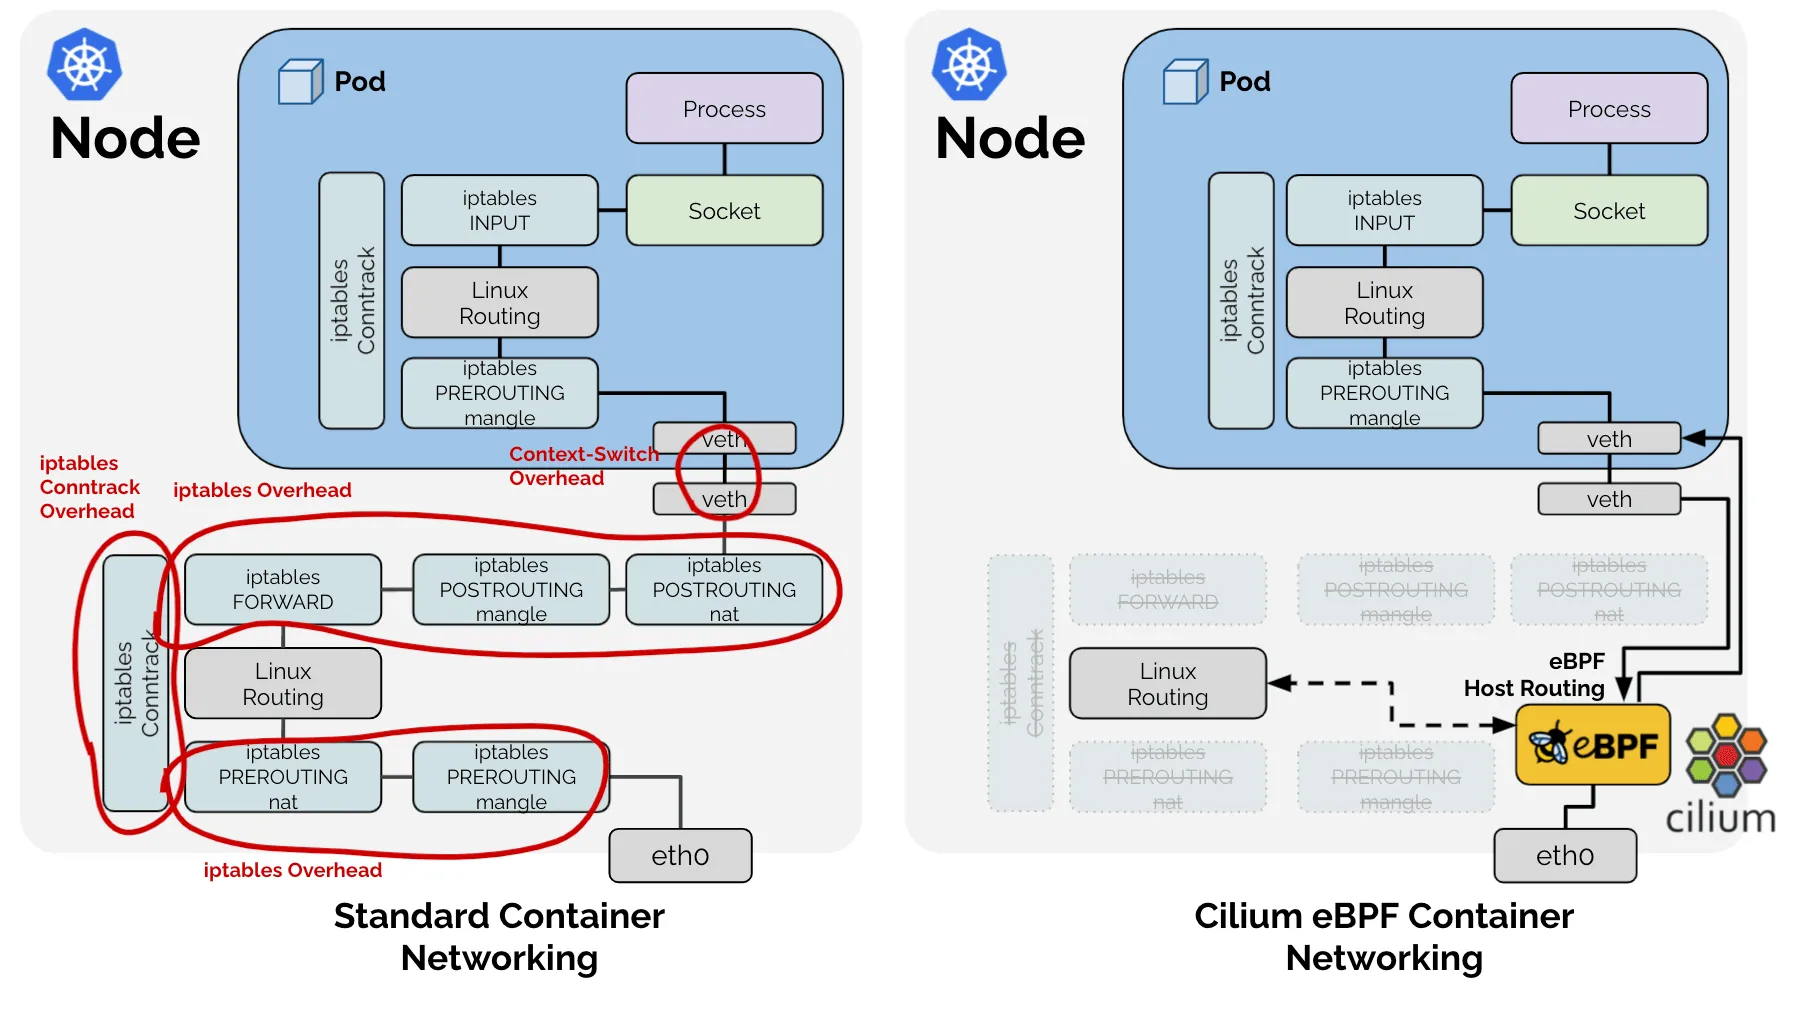
The diagram above shows the difference visually. On the left, the traditional iptables path sends every packet through multiple kernel layers (Netfilter, iptables rules, routing decisions) before it reaches the destination container. On the right, eBPF programs in the kernel handle the packet in a single fast path, bypassing the layers that cause the performance problems described here.
What eBPF Is
eBPF (extended Berkeley Packet Filter) is a Linux kernel feature that lets you run small, safe programs directly inside the kernel. You do not need to change kernel source code or load kernel modules.
Think of it as a way to extend the kernel’s behavior. Normally, the kernel decides how to process network packets and your applications only interact with them after the kernel is done. With eBPF, you can inject your own logic into that packet processing path.
# bpftrace can inspect kernel events using eBPF
# This counts how often each system call is called
bpftrace -e 'tracepoint:syscalls:sys_enter_* { @[probe] = count(); }'
The practical difference from iptables: eBPF programs are compiled, verified for safety by the kernel, and run as native machine code. They do not get slower as you add more of them. Adding a hundred services has roughly the same performance cost as adding one.
What Cilium Does
Cilium is an open-source networking, security, and observability tool built on eBPF. It replaces kube-proxy and your CNI plugin with eBPF-based alternatives. Here is what that means in practice.
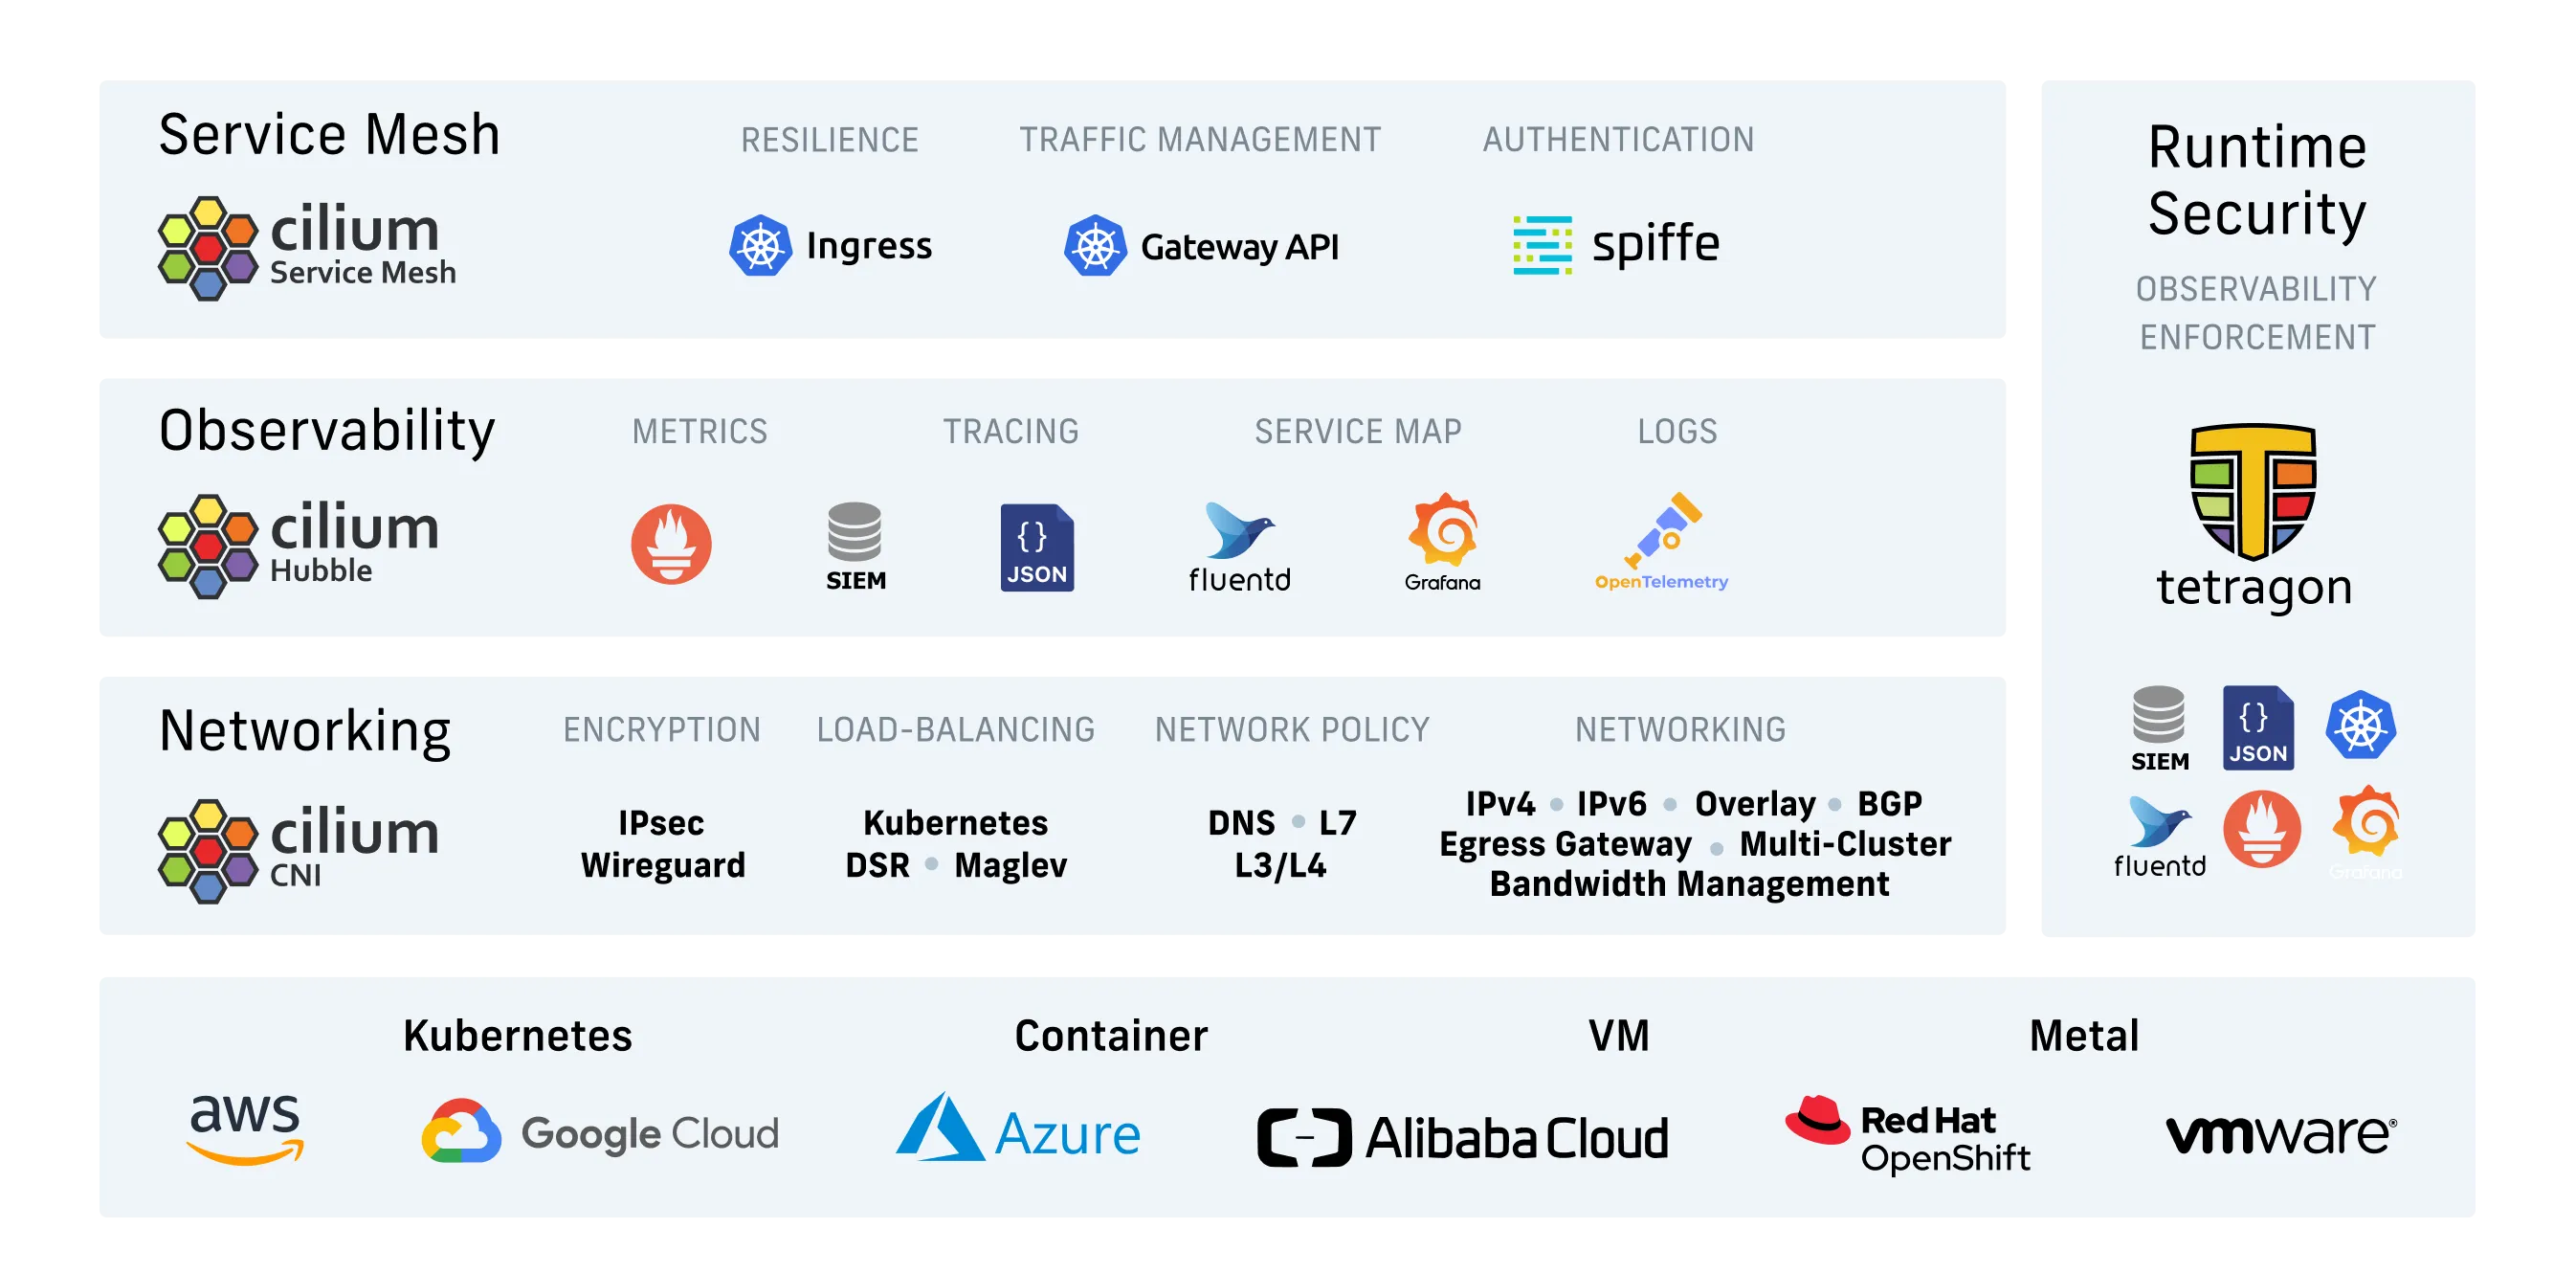
The diagram above shows how Cilium covers multiple areas: replacing traditional networking (kube-proxy and CNI), adding security policies at layers 3 through 7, providing observability through Hubble, and supporting service mesh and runtime security use cases. The rest of this section walks through the features most relevant to replacing iptables-based Kubernetes networking.
1. Performance That Does Not Degrade
Cilium replaces iptables with eBPF maps, which are kernel data structures designed for constant-time lookups. Adding more services does not slow down packet processing. The performance curve stays flat whether you have 10 services or 10,000.
It is worth noting that most teams never hit the scale where iptables becomes a real problem. If your cluster has fewer than 50 services and you are not experiencing latency issues, iptables is probably fine. Cilium’s performance advantage only matters once you cross that threshold.
2. Security by Identity Instead of IP
Standard Kubernetes NetworkPolicies are written against IP addresses or CIDR blocks. Pod IPs change constantly, which means policies that work today may break tomorrow after a restart or scale-up event.
Cilium lets you write policies against Kubernetes labels:
apiVersion: cilium.io/v2
kind: CiliumNetworkPolicy
metadata:
  name: allow-frontend-to-api
spec:
  endpointSelector:
    matchLabels:
      app: api
  ingress:
  - fromEndpoints:
    - matchLabels:
        app: frontend
    toPorts:
    - ports:
      - port: "8080"
        protocol: TCP
The policy says: only pods with app: frontend can talk to pods with app: api on port 8080. Pod restarts, scaling, and node failures do not invalidate it.
The tradeoff: CiliumNetworkPolicy is a custom resource that only Cilium understands. If you ever switch to a different CNI, your policies will not carry over.
3. L7 Policies Without Sidecar Proxies
Normally, restricting traffic by HTTP path or method requires a service mesh sidecar like Envoy injected into every pod. Those sidecars consume CPU and memory and add latency to each request.
Cilium can inspect HTTP, gRPC, and Kafka traffic at the kernel level. You can write application-aware policies without sidecars:
apiVersion: cilium.io/v2
kind: CiliumNetworkPolicy
metadata:
  name: api-rate-limit
spec:
  endpointSelector:
    matchLabels:
      app: api
  ingress:
  - fromEndpoints:
    - matchLabels:
        app: frontend
    toPorts:
    - ports:
      - port: "8080"
        protocol: TCP
    rules:
      http:
      - method: "POST"
        path: "/api/v1/orders"
      - method: "GET"
        path: "/api/v1/healthz"
This blocks any HTTP request that is not a POST to /api/v1/orders or a GET to /api/v1/healthz, all without a sidecar.
A honest caveat: L7 policies are one of Cilium’s more complex features. They require the Cilium agent to inspect application-layer protocols, which adds some overhead (though less than a sidecar proxy). They also do not support every protocol. If your stack uses AMQP, MongoDB wire protocol, or other less common protocols, check whether Cilium supports them before depending on this feature.
4. Built-in Observability with Hubble
Cilium ships with Hubble, a tool that provides real-time visibility into network traffic. Hubble shows you which pods are talking to which services, how much traffic is flowing, and whether packets are being dropped.
# Watch live network flows in a namespace
hubble observe --namespace production

# Show all dropped packets (policies blocking traffic)
hubble observe --verdict DROPPED

# See traffic between two specific components
hubble observe --from-pod frontend --to-pod api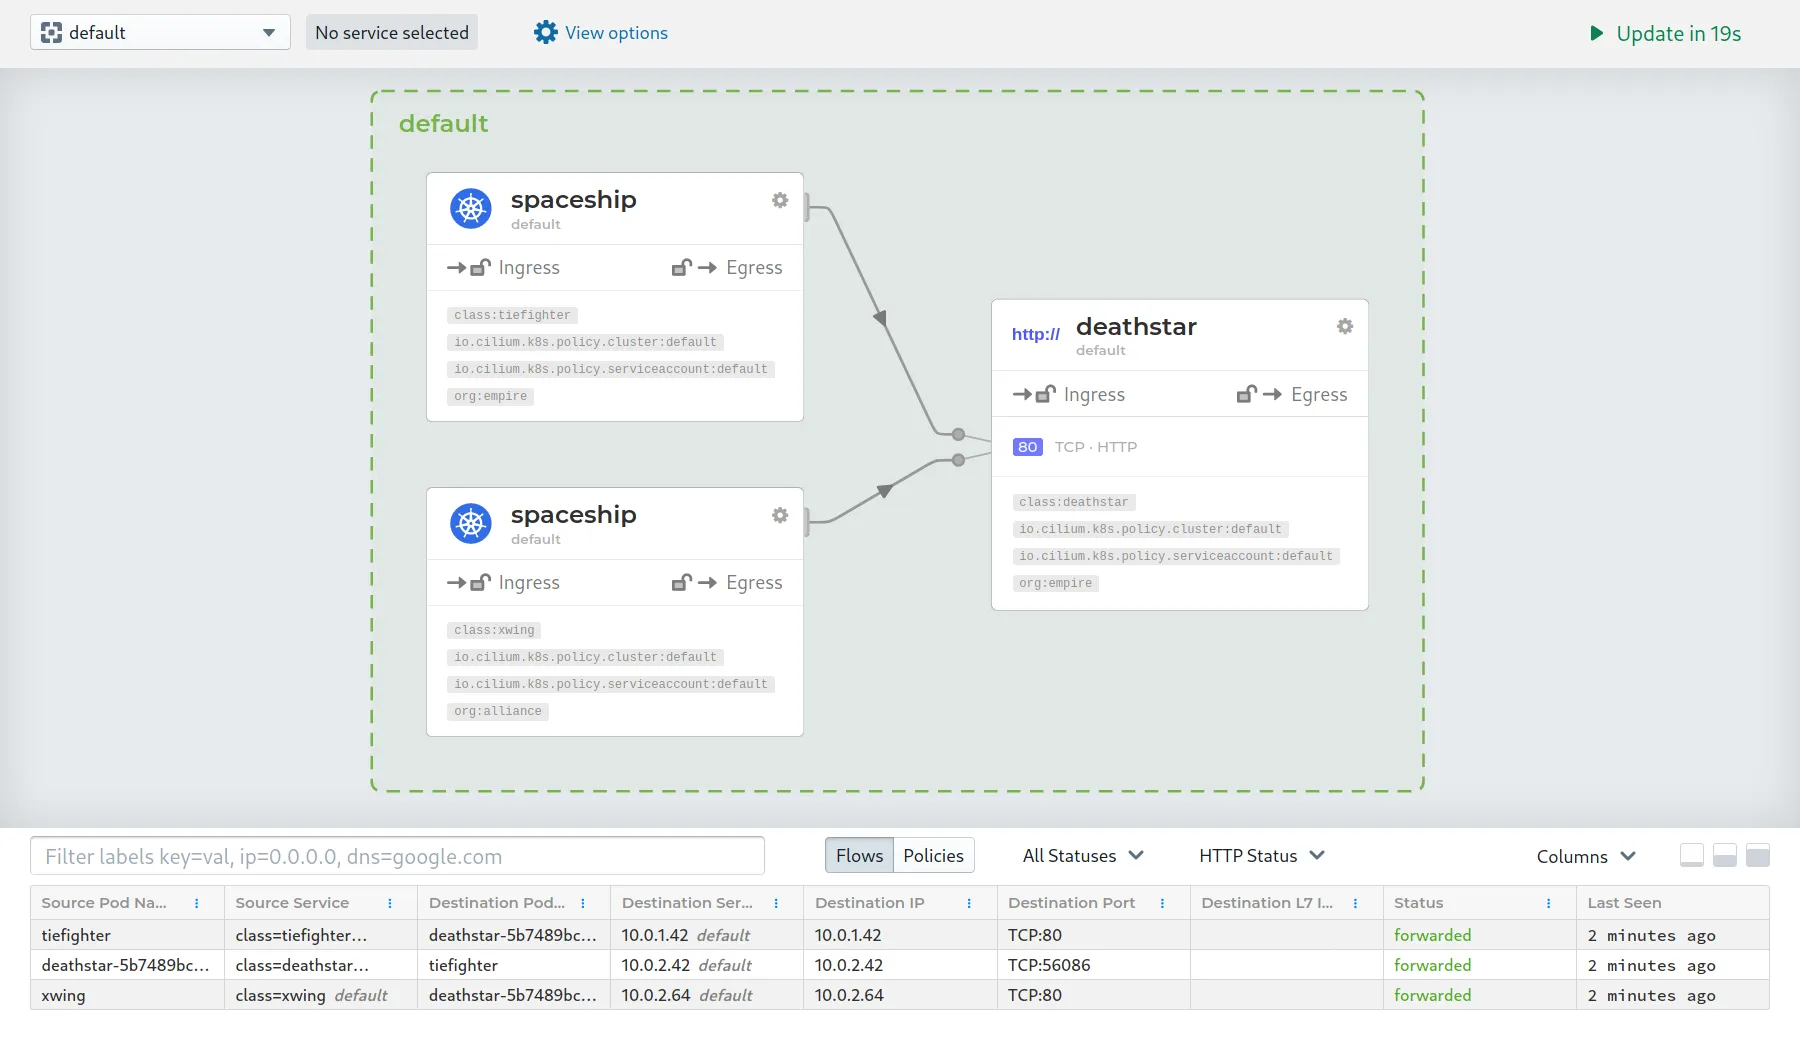
Hubble also has a web UI with service dependency graphs like the one above. Each node is a service or pod, and the lines between them show which services are talking to each other. Green lines mean traffic is allowed, red means policy is blocking it. This is useful for understanding how your applications actually communicate, especially in microservices architectures where the flow of traffic is not always obvious from the code.
5. Encryption Without a Service Mesh
Cilium supports WireGuard-based encryption for pod-to-pod traffic. Enabling it takes one Helm flag:
helm upgrade cilium cilium/cilium \
  --namespace kube-system \
  --set encryption.enabled=true \
  --set encryption.type=wireguard
No sidecars, no complex configuration, no extra CPU cost beyond WireGuard itself.
That said, most teams do not need in-cluster encryption. If your threat model does not include an attacker with access to your cluster network, this adds complexity for little benefit. It matters most in multi-tenant clusters or regulated environments.
Trying Cilium on a Test Cluster
The easiest way to experiment with Cilium is to install it on a local cluster. kind (Kubernetes in Docker) works well for this.
# Create a kind cluster
kind create cluster

# Install Cilium via Helm
helm repo add cilium https://helm.cilium.io
helm install cilium cilium/cilium \
  --namespace kube-system \
  --set kubeProxyReplacement=true
After installation, run the connectivity test to verify everything works:
cilium connectivity testThis deploys test pods across nodes and validates DNS, pod-to-pod, pod-to-service, and external connectivity. If all tests pass, your cluster is running on Cilium.
To try Hubble’s observability features, enable the UI:
helm upgrade cilium cilium/cilium \
  --namespace kube-system \
  --reuse-values \
  --set hubble.relay.enabled=true \
  --set hubble.ui.enabled=true

# Access the UI
kubectl port-forward -n kube-system svc/hubble-ui 12000:80
Open http://localhost:12000 to explore live network flows and dependency graphs.
Migrating an Existing Cluster
If you already have a cluster running with kube-proxy and a different CNI, here is the recommended migration path.
First, install Cilium alongside your existing setup. It can run in parallel with kube-proxy during the validation phase. Set kubeProxyReplacement=partial to start.
Then run cilium connectivity test to check for networking issues. If something fails, you can remove Cilium and the cluster returns to its previous state with no changes.
Once you are satisfied, enable kube-proxy replacement and remove the original kube-proxy DaemonSet. Finally, enable Hubble for observability.
A few things to watch for during migration:
- Cilium requires Linux kernel 5.10 or newer for full feature support. Check your node kernel versions before starting.
- If you use custom CNI configurations (macvlan, SR-IOV, custom routing), verify Cilium supports your use case.
- The connectivity test suite is thorough but does not cover every possible workload. Run your own integration tests before cutting over production traffic.
When Cilium Is Not the Right Answer
Cilium is a solid piece of infrastructure, but it is not the best choice for every situation.
- Small clusters. If you have fewer than 20 nodes and straightforward networking needs, Flannel or Calico will serve you well. The operational overhead of Cilium is not justified at that scale.
- Older Linux kernels. Cilium requires kernel 5.10+ for its full feature set. If you are stuck on an older enterprise distribution with a pinned kernel version, eBPF features will be limited or unavailable.
- eBPF expertise is rare. When something goes wrong with Cilium, debugging requires understanding eBPF, the kernel’s verifier, and Cilium-specific internals. This is not common knowledge. If your team is small and you cannot afford a specialist, a simpler CNI reduces the risk of getting stuck.
- The “it just works” factor. Iptables-based networking is boring and well understood. Every Kubernetes operator knows how to debug it. Cilium’s eBPF approach is less transparent, and its abstractions can obscure what is actually happening on the wire.
Key Takeaways
- Kubernetes networking uses kube-proxy with iptables by default, which scales poorly beyond a few dozen services.
- Cilium replaces both with eBPF, running packet processing in the kernel without the linear performance penalty of iptables.
- It adds identity-based security policies, optional L7 inspection, built-in observability (Hubble), and WireGuard encryption. Not every team needs all of these.
- You can try Cilium on a test cluster with one Helm command. The migration path for existing clusters is incremental and includes a connectivity test suite for validation.
- For clusters on modern kernels that have outgrown iptables, Cilium solves a real problem. For small or simple clusters, the simpler default tooling is fine.